Thursday, July 21, 2011

Lazy Me

This month I have been preparing to move. My kitchen and house have been in such a disarray which has caused my blog, my life, my focus to suffer. You would think I was all work ORGANIZING, PACKING, CLEANING, but that hasn't been the case. I have spent the majority of my time watching Korean dramas, drinking Starbucks frappuccinos , McDonald's Ice coffee, baking cakes, .....and watching more Korean drama. I did do some packing at one point, but I have since opened those boxes looking for random things. I am just so unmotivated to get on task.
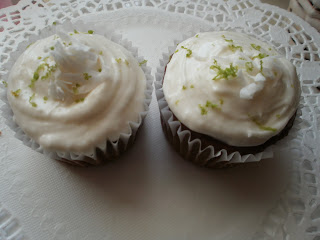
Just this last Tuesday I made this Red Velvet cake for a women's support group so I have technically done something memorable.
 Sorry everyone I will confess it was a box mix cake so you will I find no recipe for Red Velvet. However, I did make the Cream Cheese frosting - I used about:
2 cups of powdered sugar
1/4 cup butter
4 oz cream cheese
vanilla to taste (clear vanilla to keep the frosting white)
A bit of milk at the end (if needed)
I whipped this up with an electric mixer then covered my cake. It was just enough for the job. When I was spreading it over the cake it wasn't as white as it became after hardening in the fridge. The swirly look was an accident, but really impressed me. I did have to make a little bit more frosting for the star kisses; One egg white made with meringue powder, clear vanilla, powdered sugar a bit of milk and about a spoon full of cream cheese. I made this a bit stiff and worried it wouldn't pipe properly, but I was wrong it almost was to soft. I quickly did my decoration and used white chocolate chips for accents in between the frosting kisses. I was surprised how nice it looked, this was a last minute cake and my hopes hadn't been to high.
 I am not sure what is going to happen with the big move and all. I hope to take pictures of the place before and after we move in. I am excited about a bigger kitchen and the fact we will be in a house not an apartment!  I am also expecting a lot more work being in a more country environment. This could be one of the reasons for my current "Vacation Mode".

Friday, July 15, 2011

Summer Sprinkle Collection


I have always had an issue with the cost of getting a respectable sprinkle correction started. Don't get me wrong I love to decorate my cakes and cupcakes with sprinkles. I will even buy cute specialty sprinkles, (like the pearly kind) but the average sprinkle just isn't worth it. Recently a friend was making fourth of July cupcakes and couldn't find red, white and blue star sprinkles. This got me thinking how hard would it bee to make my own sprinkle??  
A month or so ago I made cupcakes for a Henna party and used a frosting to piping decorative stars. After a day the stars turned hard and a little crunchy. Then the idea struck me like a day old cupcake to the head...What if I used this frosting for sprinkles?!!?
 I new if I was thinking this someone else had too....and sure enough I was right.This link to Rainbow Sprinkles is easy and fun. I used meringue powder to make my egg white and used orange extract, but other than that I followed the recipe. The stars and strips dried at the same rate (24 hours). After the sprinkles completely dried I broke them up and moved them to a DRY container.  The only problem I had was finding a safe place to keep them while drying, and waiting a full 24 hours! To get these awesome colors I used gel food coloring and regular liquid fluorescent coloring.
A much faster sprinkle can be made with regular granulated sugar and food coloring. I would of liked to use larger sugar crystals, but I was determined to use what I had in house for this sprinkle collection.
 I used a glass bowl and simply added sugar and food color  then mixed with a spoon. Mix the color evenly and if the color is to light just add a drop or two more!

Creating a cute home for my Summer Sprinkle Collection was just as important to me as making them. I recently rescued (from my mom's garage) a spice cabinet that belonged to my great grandmother. This little cabinet had a thick layer of dust and spices dating back to 1993! With a bit of block oil I restored the wood finish and bleached the glass jars. I had found a perfectly cute home a sprinkle could be proud of.
 To make my bow secure, I used a tiny dot of hot glue. You can't even see it!

Friday, July 8, 2011

Coffee Cake

A Classic Coffee Cake recipe
After thinking about the cake my mom made for my grandmother, I had to make one for myself. Last week I made a fantastic Red Velvet cake with cream cheese frosting, but this time needed a break from frosting. I know that sounds strange, who could ever get tired of frosting! I don't know what it is maybe something in the air or the summer heat that has me out of sorts. Any who, this classic American standard was a nice sweet diversion from the normal cake frosting.


First step
Butter and flour your baking dish then put a side. I used a 7in x 11in, but you can use 9in x 13in, I don't think it matters. I was also thinking to make this in cupcake tins, but I used the last of my cupcake papers.
 I like to prep my baking dish first, so I can use the smashed butter cube in my recipe, also when the batter is ready I get impatient to get it in the oven.
You know the excitement of it all.
 Second step
The topping.
 One stick soft unsalted butter,
One teaspoon cinnamon,
 One cup flour,
 One cup brown sugar
.
 Mix your topping together.
Note: It should be a coarse consistency.
 Make sure you don't have any flour or butter chunks.
 If you like nuts this would be the time to add.
 I recommend Pecans or Walnuts.

 Step Three The cake
Mix together
1 cup (two sticks) unsalted butter
 3/4 cup packed, light brown sugar
1/2 cup white sugar
2 eggs
2 teaspoons vanilla
Using electric mixer combine ingredients.
Add eggs and vanilla towards the end.

 Step Four
In another bowl add:
2 cups all-purpose flour
1 teaspoon baking powder
pinch of salt (about a 1/4 teaspoon)
With a spoon mix dry ingredients together.
Step Five
Combine dry bowl (in three portions)
 into the wet bowl, alternating with 1/3 cup milk
When you mix your dry into wet some of the flour will get out of control and end up out side the bowl rather than in. To prevent this you can fold in the flour mix. In these pictures  I am combining my dry ingredients into the batter and used my mixer (turned off) to roughly mix the flour on the surface into the
batter. I then add some of the milk and continue to mix on medium speed.
Your finished batter should be light and smooth.
 It should also be a bit thick and hard to pour.
Remember to level out your cake before adding the topping.
Bake cake between 325 or 350 depending on heat of your oven.
 I started out at 325 for 45 minutes then increased the heat to 350 for 15 minutes. Once I got a clean tooth pick test, I turned on the broiler to brown up the topping for about two minutes. This is the most dangerous time for your cake! Watch carefully or you will burn the top.

Fresh out of the oven!

This cake was even better the next day.
I hope you try this recipe!

Sunday, July 3, 2011

Crafty Milk Can

 I have news! We are moving to a new Apartment! The husband wants to be closer to his job. This means time to clean out the closets! My biggest motivation is the reality that the new apartment will be so much smaller. This relocation has me frantically trying to reduce the amount of crafty project pile up.
The Milk Can I have been stock piling these cans for about half, if not more of BABY BEE'S life.The plan was to turn these food safe containers into cute Carmel corn, cookie, brownie, macaroon, tea, candy,(I think you get the idea) gift containers. Why did I wait so long to do this??? I don't know, it seemed like a process that would take a lot of time. It is was way easier to toss this idea in the closet than actually do it.
 Step One Remove the old label. I used my Cutter Bee craft knife, but a sharp tip kitchen knife or scissors should also do the trick. The goal is to make a strait cut then lift the label with minimal damage. You will use this paper as a template to measure the exact size of a new label. Don't worry about lifting a bit off the side of the container, you will cover the evidence so it doesn't matter, unless for some odd reason you make a whole in the side....(this shouldn't happen).
Step Two Clean out all milk powder residue. I refrained from water use. The container is coated with a water resistant paper, but I didn't want to test it so much. A good wipe removed the little bits of powder especially around the top metal lip that remained. I did wash the plastic lid with warm soapy water. Make sure to dry very well.
Step Three Find suitable paper. I used two gift bags and wrapping paper. Stiff gift bags cause more trouble when gluing to the container. Note when using gift bags: Disassemble the gift bag and make a flat surface so you can see how to maximize the paper and avoid any wrinkled spots. One other thing to consider, if your paper has a pattern make sure to notice what direction it is going
Step Four Time to glue.  Wrap the container being aware of the edges. One of my labels went a bit crooked, because I didn't pay attention to this point. I had to cut a whole new label. When your ends meet make a line of glue on the container itself and attach the lower paper then apply a second layer of glue on the paper, but not on top of the exact location your first glue line. Make sure your paper is pulled tight around the entire container, then lay it over the adhesive and smooth to finish. I used a hot glue gun to secure the paper, but it did get a bit hot on my fingers. Paste or glue stick could also work

The Finishing Touch. This is the part that I like the most, giving a bit of personality to your gift container. You can glue as little or as much as you want I started out with an information card. This can have a special message, recipe, or simply a To & From. Other ideas for embellishments are stickers, ribbons, scrapbook embellishments, faux flowers, strands of beads or pearls, small toys even hard candy. This decorated can was made for my Grandma's birthday. One of the hardest things to do is finding a gift for her. The woman who has it all.   When I visited my mom last Wednesday we had to think of something fast the big day was Friday. In the end we agreed food was the best option. Since my Grandma loves her coffee we decided to make coffee cake and cut it into round to fit inside the tin.
 The tin fit 3 cakes. The concern was how to separate the rounds of cake. The answer was easy. My mom divided each layer with parchment paper then placed a cake round individually in the center of a coffee filter. Sorry, no pictures. I am sure it looked cute. I wasn't around when the actual baking happened (Thursday) and someone.....forgot of photo log it. Anyway. The gift was delivered that evening. Friday morning Grandma had an extra special morning coffee.  

Friday, July 1, 2011

Book time

Ribbon makes a cute and practical
bookmark!
With all the non-stop fun of being a mother of an 11 month old, I decided to add one more activity to my list.
Reading A Novel.
I realized it had been over a year since I read any fiction (aside from the news). During this time my brain steadily adjusted to picture books with the simple yet profound message ( to it's target audience 2+) of color identification and name that farm animal. I had to make a change fast. Looking for a book presented some problems. If I was going to read a book it couldn't be just any book. Like that trash Oprah has in her book club. I am sorry to all those who like her recommendations, I just can't read them. I say this after enduring two of her picks. When I think about it that was about a year ago........
Any way after a full year of steady metal retardation I needed a shock to break me out of farmville and the memories of  nauseatingly bad fiction. I found a book that fit my current state better than I imagined, both in title and Author. The Idiot By Fydor Dostoyevsky.
The title is what grabbed me. I don't think this great Russian author would spend his time writing about a simpleton that can't wipe his own ass, nor am I in that bad of a state. I rather mean to say this book fits my need for a dramatic novel that is both adult themed and written beautifully. Since this is a Russian novel I am guessing it will be a tragedy, but I plan to enjoy it thoroughly.
I can't read with out TEA
A pot of tea for one is a great addition to any afternoon read.  When baby bee takes his afternoon nap I warm water for his bottle and my tea. I will admit if I don't have a cup of tea I will no doubt fall asleep and so much for book time. This is just a fact. No matter how fantastic or boring a book I can't keep my eyes open. It is a combination of lack of sleep and mental relief that the little human that depends on me for everything is currently satisfied and unconscious.
Today it is black tea with green cardamom.
I recently switched from Swan Brand Tea to Al-Kbous Tea. It was gifted to us by a Yemeni friend. At first I didn't know what to do with it. The tea is like fine coffee ground, that made my tea infuser useless. I worried my tea would be grainy, but in reality the grounds settle nicely on the bottom of the pot. The tea has a bold flavor and can hold it's own if you like to add milk/creme or a spice like cardamom.
 Green Cardamom is the same as regular... just green and stronger in smell. I add only two pods to my personal pot for a subtle flavor. Depending on how fast I drink it, I may or may not remove them from the tea.
You can get Cardamom in a powder, but it is more expensive. When you use as much as I do in cooking it is way more economical to get it in the pod form. My pods are looking a bit old in this picture, but if you get a bag you will see how green they come and the aroma is amazing.


As you can see no grains of tea in my cup... but
when you get to the end of your pot BEWARE!
I drink this tea very hot with a lot of sugar
and most importantly in very small cup.. 

Tuesday, June 14, 2011

Perfect Place for Pins


This is a great way to keep pins and Brooches safe and in a convenient place.  When it comes to Brooches I just love them. I think they are the best accessory to class up an outfit. I wear mine daily to keep my head scarf in place. A little bit or a lot of sparkle makes my day.
    One problem I ran into was keeping my Brooches safe. I had lost many rhinestones and jewels due to poor storage conditions. It goes a bit like this... I am in a hurry to remove my scarf. I take the brooch off, toss it in my bathroom drawer, or in my medicine cabinet. During this time in the drawer my jewel studded beauty gets thrashed and looses some of its luster or it falls out of the cabinet into the sink. In the end I have one less accessory.  Many of my little beauties are vintage from my mom's Etsy Store. She restores all the jewelry in her store, taking care to make sure each piece is in the best condition. I really feel terrible when I have to explain how I lost a jewel due to pure neglect. These fancy little pin cushions have  helped save my collection of pins and Brooches. Originally the idea was intended to class up a sewing table or add a special touch to a sewing box. I personally think these little beauties are to cute to stick in a box. I have mine in full view. This is a simple project that anyone can do with little difficulty.


What you will need

Pin Cushion
Velvet
 Small Container
(a teacup works great)
 Straight pins


 Cut your velvet to the appropriate size to cover your pin cushion, A little over lap is okay
 Pin the material to the top of the tomato cushion (green part).This may take a few pins. I do it this way because it is stiffer at the top and more difficult to stick pins in. Try and make the fabric as smooth as possible. Once you have your cushion covered and secure fit it in into your teacup, pin side down. The cushion should fit snugly in place.
Easy Right?!!

Sunday, June 12, 2011

Home Grown

Last Wednesday I visited my mom and her garden. Here are a few pictures from my visit.


 Typically almonds are not consumed until the hulls are remove then place in the sun to harden - at least that's the way we have always done it. That process is to long for my husband. I guess it is common practice in Palestine to eat the almond while they are still "Green". He actually picked one of these right off the tree and took a bite, then decided it was still to soon . Honestly, I wouldn't know to me it is all to soon.

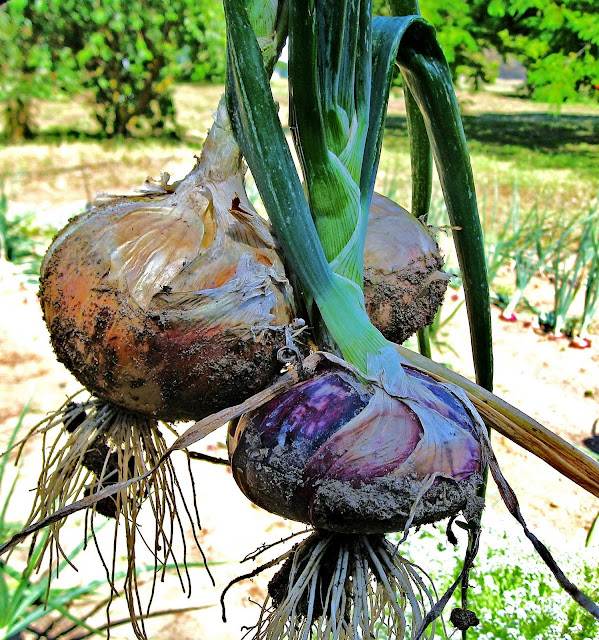
Growing up I hated yard work. I couldn't, for the life of me figure out why someone would want to grow food when it was readily available at the market. I'm not sure what happened to me, ( maybe it was growing a baby that changed my mind) but I totally enjoy plucking onions out of the dirt. These onions are sweet and awesome in a summer salad or sandwiches.


 Boysenberry picking is always a pleasure. I had to go home with a basket of berries, even if the heat was getting a bit uncomfortable. The weather has a major role in how long the berry season lasts at my mom's house. It gets so hot the berries just shrivel up on the tree. I hope I can get another basket this next week. I love summer, but I am not looking forward to the extreme heat of the valley. 


The story of the boysenberry begins with Rudolph Boysen. He was a farmer who experimented and came up with this new strain of berry, but the plants kept dying. Walter Knott was able to save the berry and make it famous. For more about the boysenberry, Walter Knott, his famous farm, and Theme Park check out Knott's Berry Farm . I love this story, it gives you a real nice slice of American pie!


After my visit and tour of the yard I had to get moving on down the road. My little boy had enough of just about everything and needed to take a nap. We packed up in a hurry and started the trip home, but not before my mom gave me a nice cool drink for the road. This was a new one for me. I didn't know two of my favorite things had been combined, Green Tea and Ginger Ale!


Friday, June 10, 2011

Shaved ice with Berries


After picking berries in the summer heat I needed a cool treat. This is a simple summer dessert that will cool you down fast. The concept is simple shaved ice and Sweetened Condensed milk, then add your topping(s). You can get creative with the ingredients, sweet red bean paste, peaches, mango's, pineapple, banana purée or berries all work well. I used fresh picked Boysen Berries. The unexpected rain gave my parents garden the extra water it needed to produce the sweetest berries yet!
The only problem you may run into is the shaved ice. I suggest a snow cone maker. My blender worked well enough, but the ice still had a few chunks.

Helpful Hints
  • Have all your ingredients ready before you prepare your ice.
  • purée a small portion of your fruit to get more flavor
  • don't be shy with the condensed milk
  • don't get greedy and use a big glass, I made this mistake and my mouth was frozen
  • try layering fruit and ice it looks amazing
  • save unused condensed milk in a squeeze bottle 


Monday, June 6, 2011

Henna Party

 Saturday night I invited some friends over to my house for a last minute henna party. A friend brought the henna and I provided the snacks and dinner. She made the henna herself from a powder, essential oils, lemon juice, and water. I suggest making your henna. Sometimes the pre made cones of  henna can be to dry or  have additives that could irritate your skin.
For more Henna or Mehndi check out these pages

 I had wanted to decorate a cake with henna design but my time had run out. I then found the cutest cookie ever! The idea shows up on several different blogs, but I think this is the original  .
 I used my own favorite gingerbread recipe and then followed the example on Sprinkle Bakes blog. It was so easy and fun. As you can see my henna skills are not so great. I need to bake more cookies.


Last minute chocolate cupcakes whith chocolate frosting.
I know they look poor ....almost naked with no design.

A little bit better....but still simple.
The turquoise frosting was orange flavor.

Wednesday, May 25, 2011

Good Morning White Chocolate Soy Mocha!


Out of curiosity, I picked up a box of Coffee flavored soy milk . I am not a fan of soy so I had low expectations ,but I was pleasantly surprised!
 In this drink 

2oz boiling water 
 heaping spoon of instant coffee
handful of white chocolate chips
Creme Coconut
Coffee flavored Soy Milk
Ice

Mix hot water and Instant coffee,
add white Chocolate chips- If your chips are not melting
put coffee mix in microwave for 10 seconds to help the process
add Creme Coconut to taste
add Coffee flavored Soy milk
shake and pour over ice


Jelly Sweets! I just love them.
 It isn't everyday I find one I can eat. I am turned off in a major way by gelatin. First, it has a crazy extraction process . Secondly, I am Muslim and I don't dig on swine. I don't even like to take a chance that piggies maybe in my jellies. It starts in the back of my mind, images of animal carcases being dissolved in acid. Don't get me wrong I love meat. I eat hot dogs, I know the ickyness of meat processing. I just don't want to open a jelly cup and see a sad little horse or piggy looking at me. It is a sensitive subject.
These jelly cups are made with Carrageenan a red seaweed product. I have been looking into gelatin alternatives  for the last couple of months. I have found Asian products use a variety of seaweed based gelatin. This was a great comfort to me and my vegetarian friend Kelly.  Agar-Agar  is a great seaweed gelatin and I found it easy enough at my local Asian market. It has many names, so it is best to take them all with you and ask for help.

Monday, May 23, 2011

Creme Coconut

German Chocolate cupcakes
with
Coconut Cream Cheese frosting
 The coconut cream cheese frosting was an experiment. 
I added some sweetened coconut creme to my cream cheese frosting recipe
 and used a bit of lime zest and shredded coconut for garnish. 
I will do this again! 


Virgin Pina Colada
 1/4 cup Coconut Creme
Thick slice of fresh Pineapple
and ice

Yellow Drink Umbrella and Pineapple wedges are a must!


Friday, May 20, 2011

Strawberry Lychee Smoothie


Today after my work-out I was starving! I wanted to make some pasta, but I looked at my scale ( I recently moved my bathroom scale to the kitchen) and lost the urge for carbs. Then my attention shifted to my overflowing fruit basket. I don't know why but it looked like a lot of work to peel and I had fruit salad for breakfast. Then it came to me! Smoothie Time!
In this blend :
 Fat Free Strawberry Yoplait Light
Fresh Strawberries
2 Lychee (can)
nectarine
ice

1.Rinse and cut off inedible parts of your fruit  2.Add your fruit and a few spoons of Yoplait to blender  3.Add ice and blend. Pour in your favorite cup and enjoy.

Thursday, May 19, 2011

Success at the Market

My Husband took over the food shopping some time back. He looked at it as one of his responsibilities as a provider to bring household necessity. I appreciated it greatly since I had an aversion to grocery stores. For years I avoided them. The last place I wanted to be was the frozen food section in an overpriced chain store. Then to make matters worse, stuck in my kitchen for hours cooking! It was also agonizing to see how much food cost. All I could think about at the check-out line was how I could of bought a new dress or a pair of sandals for the same price. What a wast.

Two years latter I have started to change my mind. This came with a new interest in food and cooking.  My husband brings great things from the grocery store, but I needed a new twist or two. Variety is the spice of life!

I was so amazed with what I found today during my shopping. I am still a thrifty shopper when it comes to food, but I have learned that doesn't mean I have to sacrifice quality. For example look at my finds today at the 99cent Only Store, some are even certified organic!   

Sambazon Acai Smoothie Packs
(4 individually packaged in a bag)
This is going to be my good morning smoothie!


Pearl Soy Milk coffee flavor
Pom Light Wild berry Tea
Santa Cruz Champagne Style sparkling Lemonade

package of three Romaine Lettuce hearts,2 cantaloupes, bag of fresh Anaheim chilies (not hot),
acai smoothie packs, two quart containers of Yoplait yogurt in plain and strawberry, one dozen medium eggs, 1gallon of milk, can of jumbo olives, French bread, Russian black bread, and drinks!


My second store today was a new experience. Vallarta Supermarket , the happiest grocery store on earth! I walk in and a splash of color and bright lights impressed me and upbeat Hispanic music played a little bit to loud for background music. I found my self happy to be shopping for vegetables and fruit! In my opinion  Asian and Hispanic markets have the best deals on produce.


One quick shot of  some of the fun that is Vallarta.


Jamaica (Hibiscus) for sale!


Coconut crazy.
Two brands of coconut water and the long awaited Cream of Coconut! I have been on the hunt for Goya Creme De Coco for a drink recipe that supposedly is pure coconut bliss!

Chipotle Peppers in Adobo Sauce
This little can of goodness is a must have
if you like spicy Chipotle flavor.
At the end of my food shopping I revised my receipts and felt a sense of satisfaction. I saved on basic food items so in the future when a recipe calls for an expensive ingredient or  I want to treat my self to a tasty gourmet item from a more expensive grocer It won't hurt my budget!...... In all fairness the extra money saved is most likely going towards shoes.